High-Level Process
The card onboarding integration follows a webhook-driven asynchronous pattern, allowing your system to react to state changes in real-time:Integration Steps
Step 1: Initiate Application
Your customer submits their card application through your interface. Collect all required information and submit to Nordiska’s Card Service.Step 2: Submit to Card Service
Make a POST request to/api/v4/engagements/card/onboarding with the applicant’s information. The service immediately returns an onboarding ID and begins processing.
The unified API supports both consumer and business onboarding through the onboardingType discriminator field:
- Set
onboardingTypeto"CONSUMER"for consumer customers - Set
onboardingTypeto"BUSINESS"for business customers (requires additional company information)
Step 3: Handle Processing
The Card Service performs automated checks:- KYC verification against PEP and sanctions lists
- Credit scoring through bureau integrations (Schufa, Creditsafe for businesses)
- Internal risk assessment
- For businesses: Additional KYB verification and signatory authorization checks
Step 3a: Document Upload (if required)
For certain business types, additional documentation may be required. When the status changes toAWAITING_DOCUMENTS:
- Notify the customer that documents are needed
- Collect the required documents (e.g., tax registration)
- Upload via
POST /api/engagements/card/onboarding/{onboarding-id}/documents - Status changes to
AWAITING_DOCUMENT_REVIEW - Wait for document review completion
- Content types:
application/pdf,image/* - Maximum file size: 10 MB
- Document types:
TAX_REGISTRATION
Step 4: React to Webhooks
Based on the processing outcome, you’ll receive one of several webhooks:- SIGNING_SESSION_CREATED: Application approved, redirect customer to sign
- ONBOARDING_REJECTED: Application declined, show appropriate message
- ONBOARDING_FAILED: Technical issue occurred, handle error gracefully
Step 5: Document Signing
For approved applications, redirect the customer to the provided signing URL. The signing service handles:- Document presentation
- Identity verification
- Qualified electronic signature capture
Step 6: Card Creation
After successful signing, create the card in Enfuce:- Create customer record
- Create account linked to credit facility
- Order physical/virtual card
Step 7: Complete Onboarding
Once Enfuce confirms card creation, the onboarding completes and the customer can start using their card.State Management
State Transitions
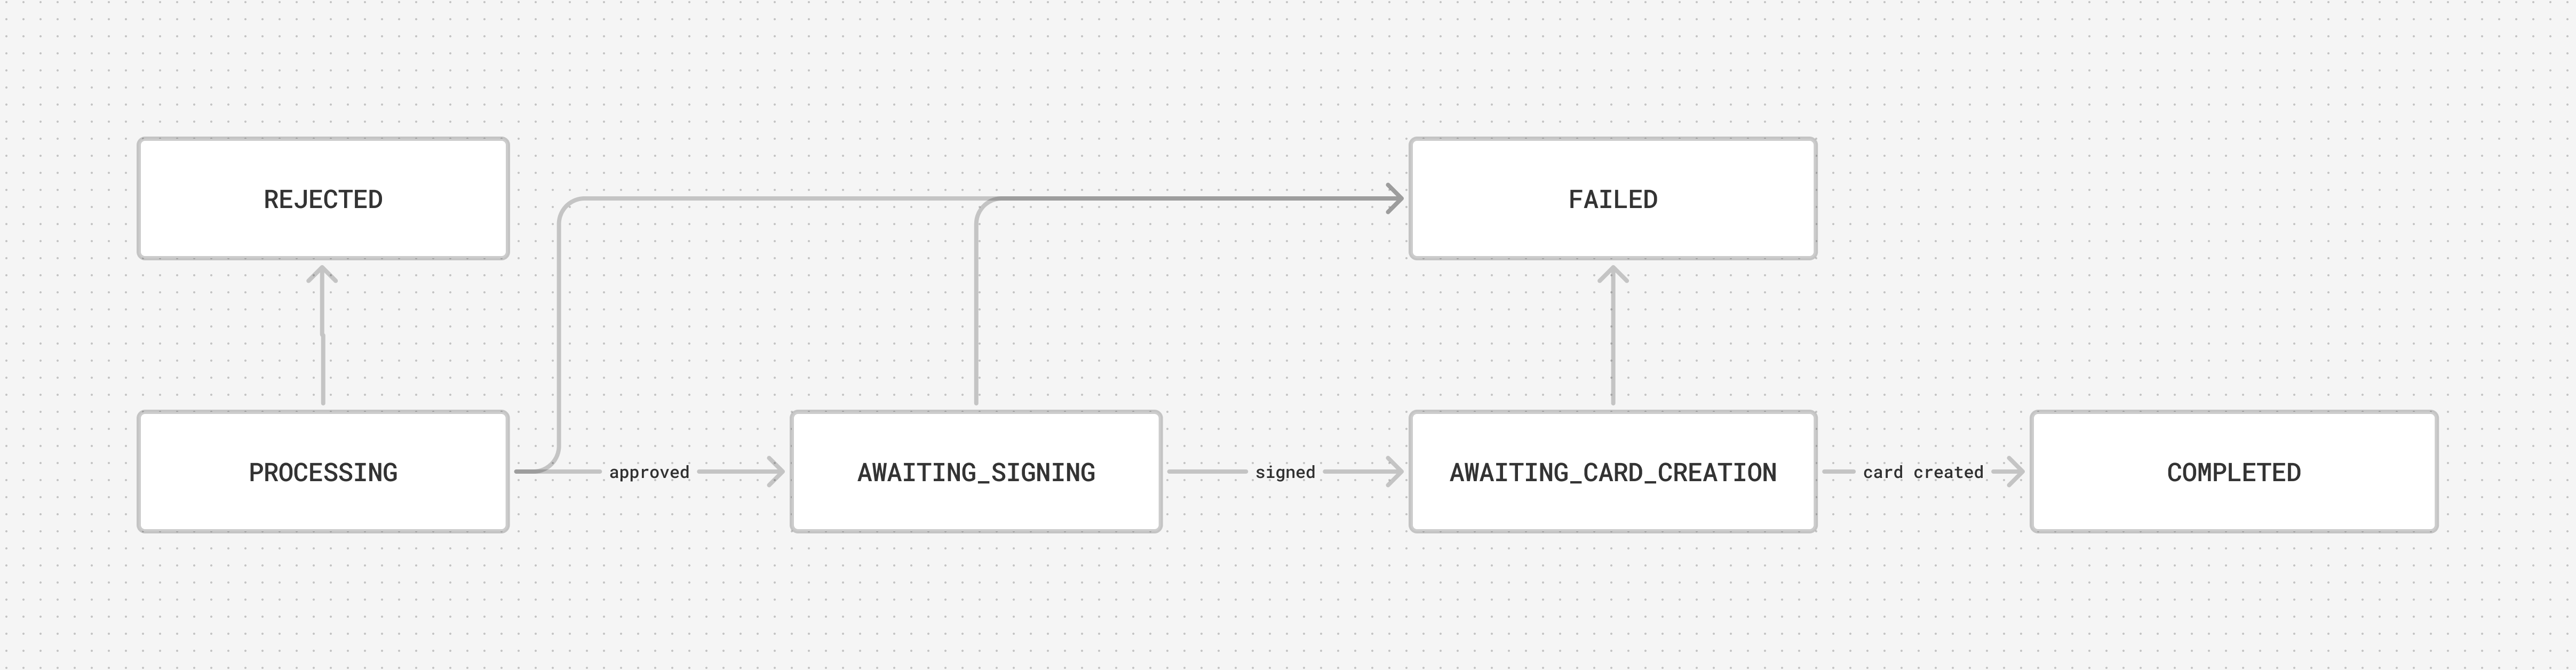
The onboarding process moves through defined states, each representing a specific phase:PROCESSING
Initial validation and automated checks in progress.Duration: 3-10 secondsNext States:
- AWAITING_DOCUMENTS (documents needed)
- AWAITING_SIGNING (approved)
- REJECTED (declined)
- FAILED (error)
AWAITING_DOCUMENTS
Additional documentation required from applicant.Duration: Customer-dependentActions Required:
- Notify customer of required documents
- Upload documents via POST /api/engagements/card/onboarding//documents
- AWAITING_DOCUMENT_REVIEW (documents uploaded)
AWAITING_DOCUMENT_REVIEW
Documents submitted, under review.Duration: 1-3 business daysNext States:
- AWAITING_SIGNING (approved)
- REJECTED (invalid documents)
AWAITING_SIGNING
Application approved, waiting for customer signature.Duration: Customer-dependent (max 30 days)Actions Required:
- Redirect customer to signing URL
- Monitor for completion webhook
- AWAITING_CARD_CREATION (signed)
- FAILED (signing expired/cancelled)
AWAITING_CARD_CREATION
Documents signed, ready for card issuance.Duration: Partner-dependentActions Required:
- Create Enfuce customer
- Create Enfuce account
- Order card
- COMPLETED (card created)
- FAILED (creation error)
COMPLETED
Onboarding finished successfully.Result:
- Credit engagement active
- Card ordered/issued
- Customer can transact
REJECTED
Application declined during assessment.Reasons:
- KYC_DENIAL
- KYB_DENIAL
- CREDIT_SCORING_DENIAL
- UNAUTHORIZED_SIGNATORY (businesses only)
- INVALID_DOCUMENTS
- KYC issues: Our AML team will handle these manually and after review, the user can start new onboarding
- KYB issues: Business verification failed, contact support
- Credit issues: Recommend that you let the customer reapply after 3 months with new onboarding
- Signatory issues: Customer must provide proof of authorization to sign for the business
- Document issues: Re-upload valid documents
Webhook Implementation
The integration relies on webhooks to notify your system of status changes in real-time. When key events occur (approval, signing completion, etc.), Nordiska sends HTTP POST requests to your configured webhook endpoint. Key webhook events:- SIGNING_SESSION_CREATED: Application approved, customer needs to sign
- SIGNING_SESSION_COMPLETED: Customer finished signing documents
- ONBOARDING_COMPLETED: Entire process completed successfully
- ONBOARDING_REJECTED: Application declined during assessment
- ONBOARDING_FAILED: Technical error occurred
For complete webhook implementation details, security requirements, and code examples, see our Webhooks Guide.
For detailed API documentation and endpoint specifications, please contact your Nordiska integration specialist.